
Have you ever poured your heart and soul into something that doesnt really matter but you really care about it, and then halfway through you realize you have to redesign?
Over the last few years I have discovered and fallen in love with woodworking. However, so far I mainly made small beautiful wood sculptures. So to level up my skills I wanted a project where I could learn as much about woodworking and sculpting as possible. Online(https://www.youtube.com/@CallMeMabie/videos(Call Me Mabie, the maker documentary series)) I come across something called a tambour cabinet(I have no idea what it has to do with drums(tambour=drums in french)). And it fascinated me that the doors even though out of wood could easily roll away into the back or inside of the cabinet. So, of course I had to attempt to make my own. Since my version is smaller I call it a box. The nice thing about a box is that it has several sides, an easy way to add other woodworking details I wanted to learn.
Like every project it starts with a prototype, cardboard prototype to be precise.

Usually tambour cabinet doors are made with many interlocking pieces of wood with a sheet of canvas glued to them for extra support. However I do not have the tools to make this interlocking mechanism. So instead I decided to just completely rely on the canvas.
I built a few different prototypes of different sizes and Shapes. The triangular one can do S Shaped tracks since it can bend in both directions. The big rectangular one was surprisingly as good at turns as the small rectangular one. And the one I made from chopsticks was terrible not because of its shape but rather because I should have sanded the parts that have to slide inside the track. What I learned is that for my purposes all 4 shapes and sizes are as good. The important thing is that the part that slides in the track is smooth.
I first started with cutting a track into a piece of cardboard but quickly realized that was not practical since cardboard has these wavy things that give it structure, but that also make the track bumpy when going perpendicular to them even when flattened. Now with wood this wood :) not happen but I dont have the tools to cut a nice smooth track into wood. So on to a new idea.
Next, I used a flat piece of cardboard and glued other cardboard on top to make the track and that worked much better. However, I made the track to thin which made it difficult to move the door. So I built another version where the track was wider, maybe a bit to wide? But even though it was much wider then it needed to be the door did not fall out. So, the track needs to be as smooth as possible and a bit wider is better.
Also, it is important that the posts holding up the box are far enough from the track so that the door does not get stuck/hit them.
I also made a circular version thinking the door would have an easier time turning since its always turning, but it turns out that if the rectangular box has a wide track it makes no real difference.
The main reason I stayed with the rectangular shape is because if I made a circular box I would use log slices. However, sculpting the top of a log is much much much harder than sculpting its sides and since the rectangular shape forces you to make slabs this problem does not arise.
For the main box I used cedar bush wood(not cedar tree) because its nice and soft making it easy to work with.

First up I had to make my log into slabs. This can be done by hand, but it takes a vvvvveeeeerrrrryyyy long time so I got my dad to help me with power tools to cut and plane. (if you plane air does it become an airplane? :) )
Once that done, I first measured and traced 2 planks for the top and 2 for the bottom, making sure the 4 pieces were the same length and width since the track has to align on the top and bottom. To cut out the track, I drilled a small hole where it should be, allowing to insert the saw. I used a saw where you can unscrew its small blade letting me cut the track only without having to cut starting on the outside. This saw is also ideal for making turns.
Because the track is only about 1cm wide and I cut ruffly in the middle, the next step is sanding, and sanding and sanding some more until the whole thing is sanded. Who knew woodworking was 50% sanding.
Next up, making the doors.
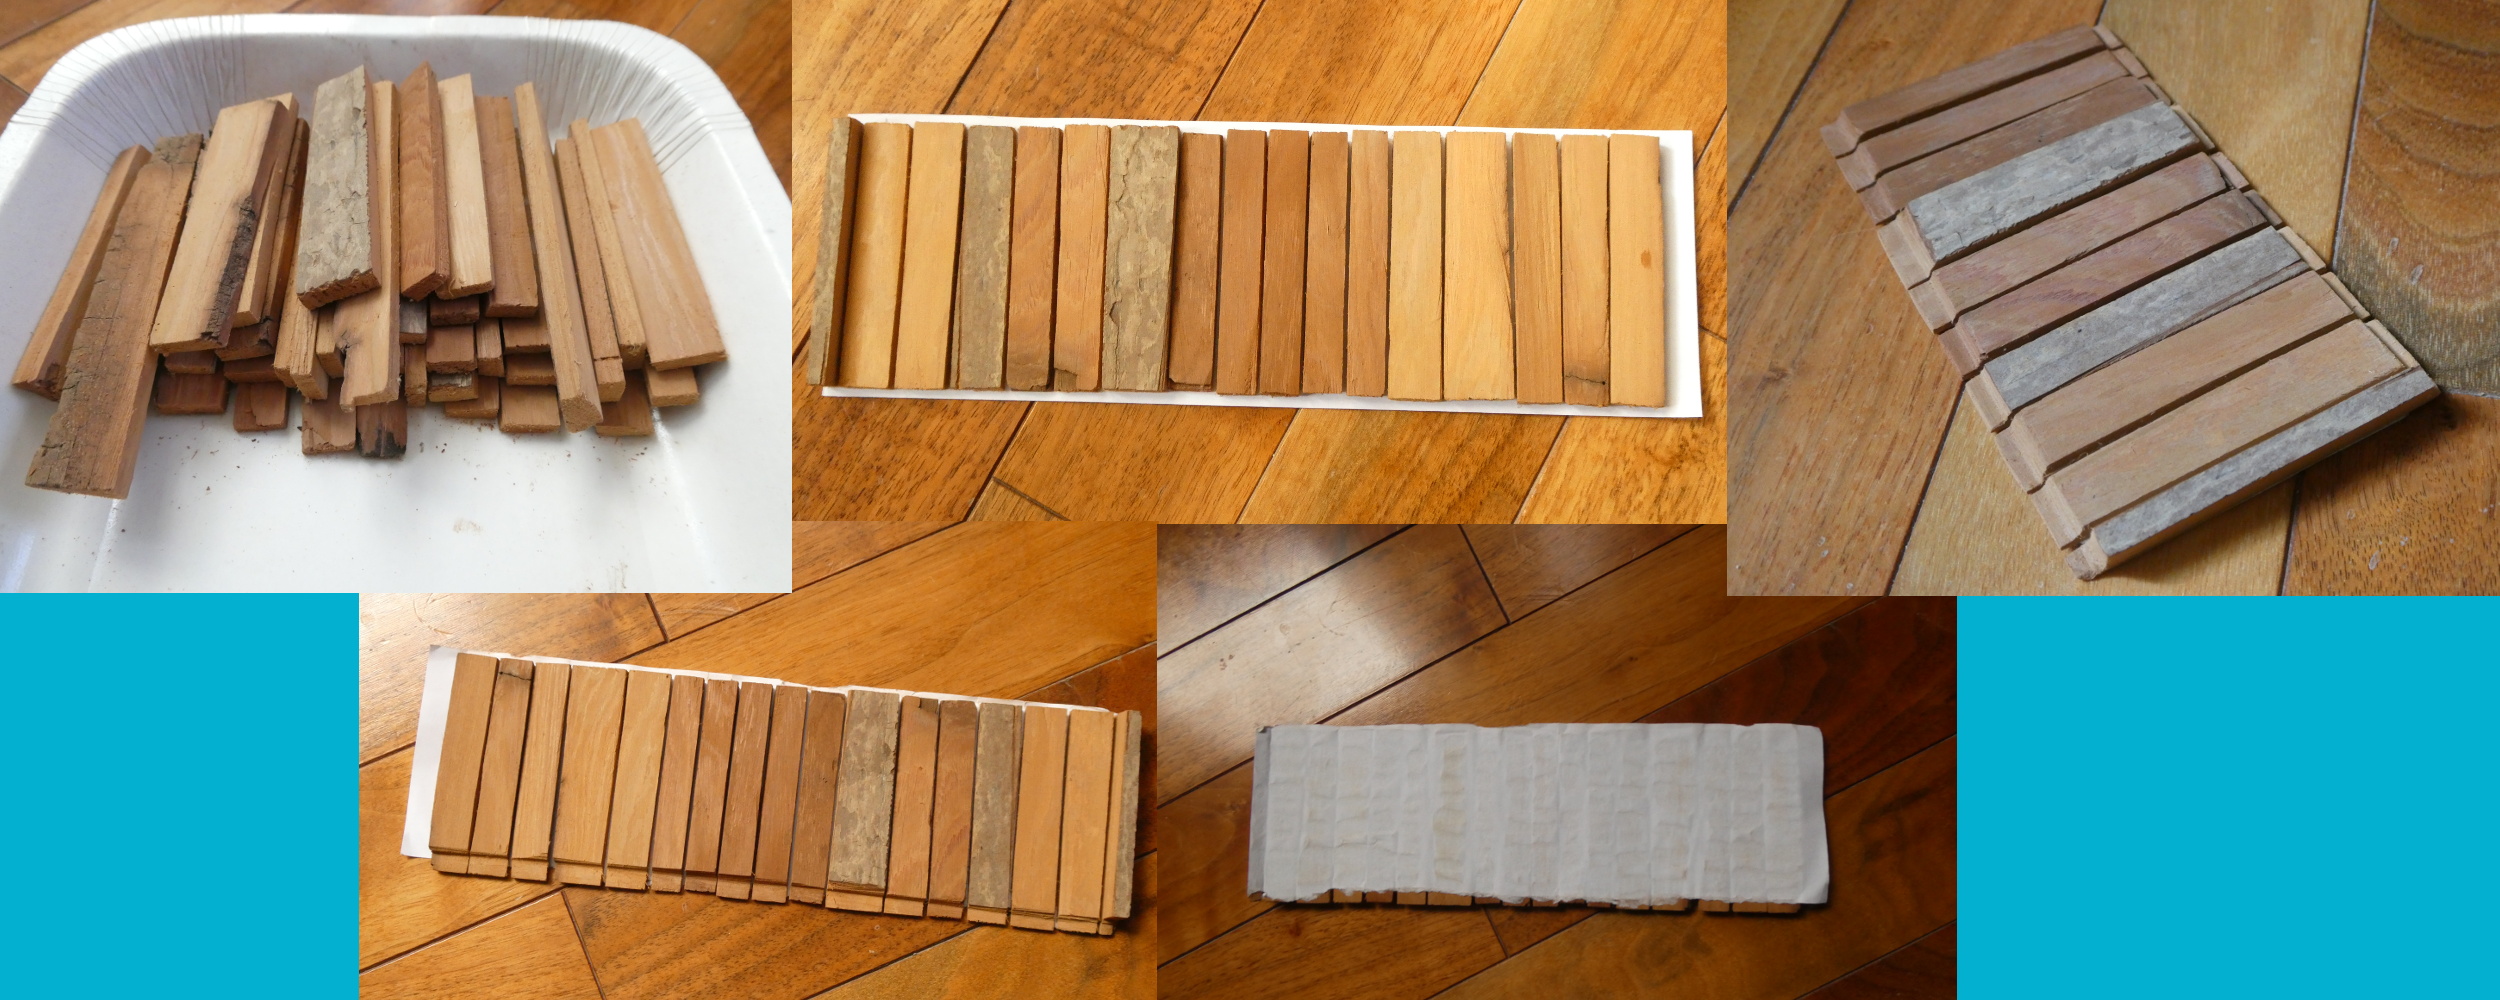
So far everything was going well. I cut lots of 6cm X 2cm X 1cm strips of poplar bark, but then realized they where to thick, so I sliced them again making them 6cm X 1cm X 1cm. After briefly sanding each piece, I glued them onto a piece of paper. Once the glue had dried, I sanded the bottom and top down to 1mm such that it would easily fit into the track in the box. I would later make a few modifications(see final assembly section) but I'm getting ahead of myself, for now it's not bad. I also carefully ripped the paper of in this area because I had initially cut the paper slightly to long and it was easier to ripe it than to try to somehow smoothly cut it off.
(Side Note on Sanding: The softer the wood the more easily it produces lots of saw dust which is not healthy to breath in so be nice to yourself and do sanding outside even if it's winter.)
(Side Note number 2(also be careful when writing "note" cus if you forget the e it becomes "not" :) )): poplar bark is awesome for beginners because it's so soft that the grain of the wood is barely noticeable and it looks amazing when applying oil on it as a finish. Many of my small sculpting projects are made with poplar bark.)
Then I did all the decorative stuff as described below.(with lots more sanding :) )
At this point however, I realized that my prototypes where incomplete and that I needed an inside wall to stop any objects from falling onto the track in the back of the box while the box is closed. Unfortunately, I had already carved some decorations into the inside of the back panel because even though they would be hidden by the doors if fully open, the idea was to have a little easter egg. I really wanted these decorations to be visible if the doors were open just a crack, but this idea was quickly falling apart.
It is also at this point that I realized I need to be able to disassemble the box incase of repair, but one problem at a time.
Making things worth the inside of the box is already quite small so this wall would have to be very thin to have any room in the box at all. Now I had 2 options:
1) Have no inside wall and always worry that the door will jam.
2) Make an inside wall making these decorations completely invisible at all times.
Well, I chose option 3.
I initially had no idea what option 3 would be, but after rummaging through my scraps and materials I found the perfect solution. I made a wall out of colored strips of transparent plastic that I taped together. To be able to attach it to the box I taped 2 thin wood sticks on either side which would be inserted into holes on the inside of the top and bottom of the box. Once I tested that that worked well, I made more of it for the entire insides.

To assemble a box there are many options. These are the common ones:
1) just glue the flat sides
2) glue the flat sides and add nails
3) screws
4) use a wood joinery technique like dove tails
Since this whole project is about learning more about woodworking, I initially thought I would try dove tails. But the more I thought about it, it became clear that the way I designed the box there was no space for them. The raised panel is flat in the back and to thin to carve dove tails into. So, even though dovetails are structurally much better I decided to leave that adventure for a future project and instead just glue the sides together. I later reinforced the glue joint with paper on the inside. Gluing everything however is not a great idea since I need to be able to unscrew the box in case the door jams despite the inside walls. Its only good engineering if you can open and fix it. So, screws and glue it is.

I assembled the inside wall and the top and bottom and realized that since the inside wall only holds the top up in the back the top is leaning forward. To fix this I added 2 pillars in the front like in my prototypes. To allow disassembly for door repair, the sticks of the pillars and back wall are just pushed into holes in the top and bottom, no glue required.
Next up, outside walls.
I drilled 3 holes in both side walls and then drilled(with 2 drill bits smaller) into the top and bottom of the box(you want the screws to sit tight but not to tight). The back panel is only glued to the side walls to allow the box to be unscrewed.
At this point I thought the build was complete, just add a few important final touches like adding small popsicle stoppers to the side walls so that the doors could not get lost in the back and tada, job complete.
Well..., not so fast. After sanding the doors where needed, they were working great, but the right one sometimes got stuck. It turned out I made the door a little to short so at the corner it would sometimes jump out of the track causing it to get stuck. After debating if I should redo the door I opted for extending the last 4 pieces at the top. It turns out only the back needed to be extended because if the end of the door does not jump out the middle section will have a hard time jumping out(unless its way to short of course, or you open it fast/high acceleration).
Last but not least I added feet so that the art work at the bottom would be less in danger of scratches.
And now the only thing left to do is applying linseed oil on the non-chocolate raised panel frame and on the side walls which makes the box's beauty really pop.
And here we are almost a year later and the box is finished!
And the door really works! like really works great!
And if you shine a flashlight inside while the doors are partially open you can see the box's little secret!

I decided to decorate the bottom and top with low relief(sculpted decoration is lower than surroundings). The top would have snowflakes because I wanted the ceiling of the box to be the winter night sky. And the bottom would be flowers because snowflakes are winter flowers.
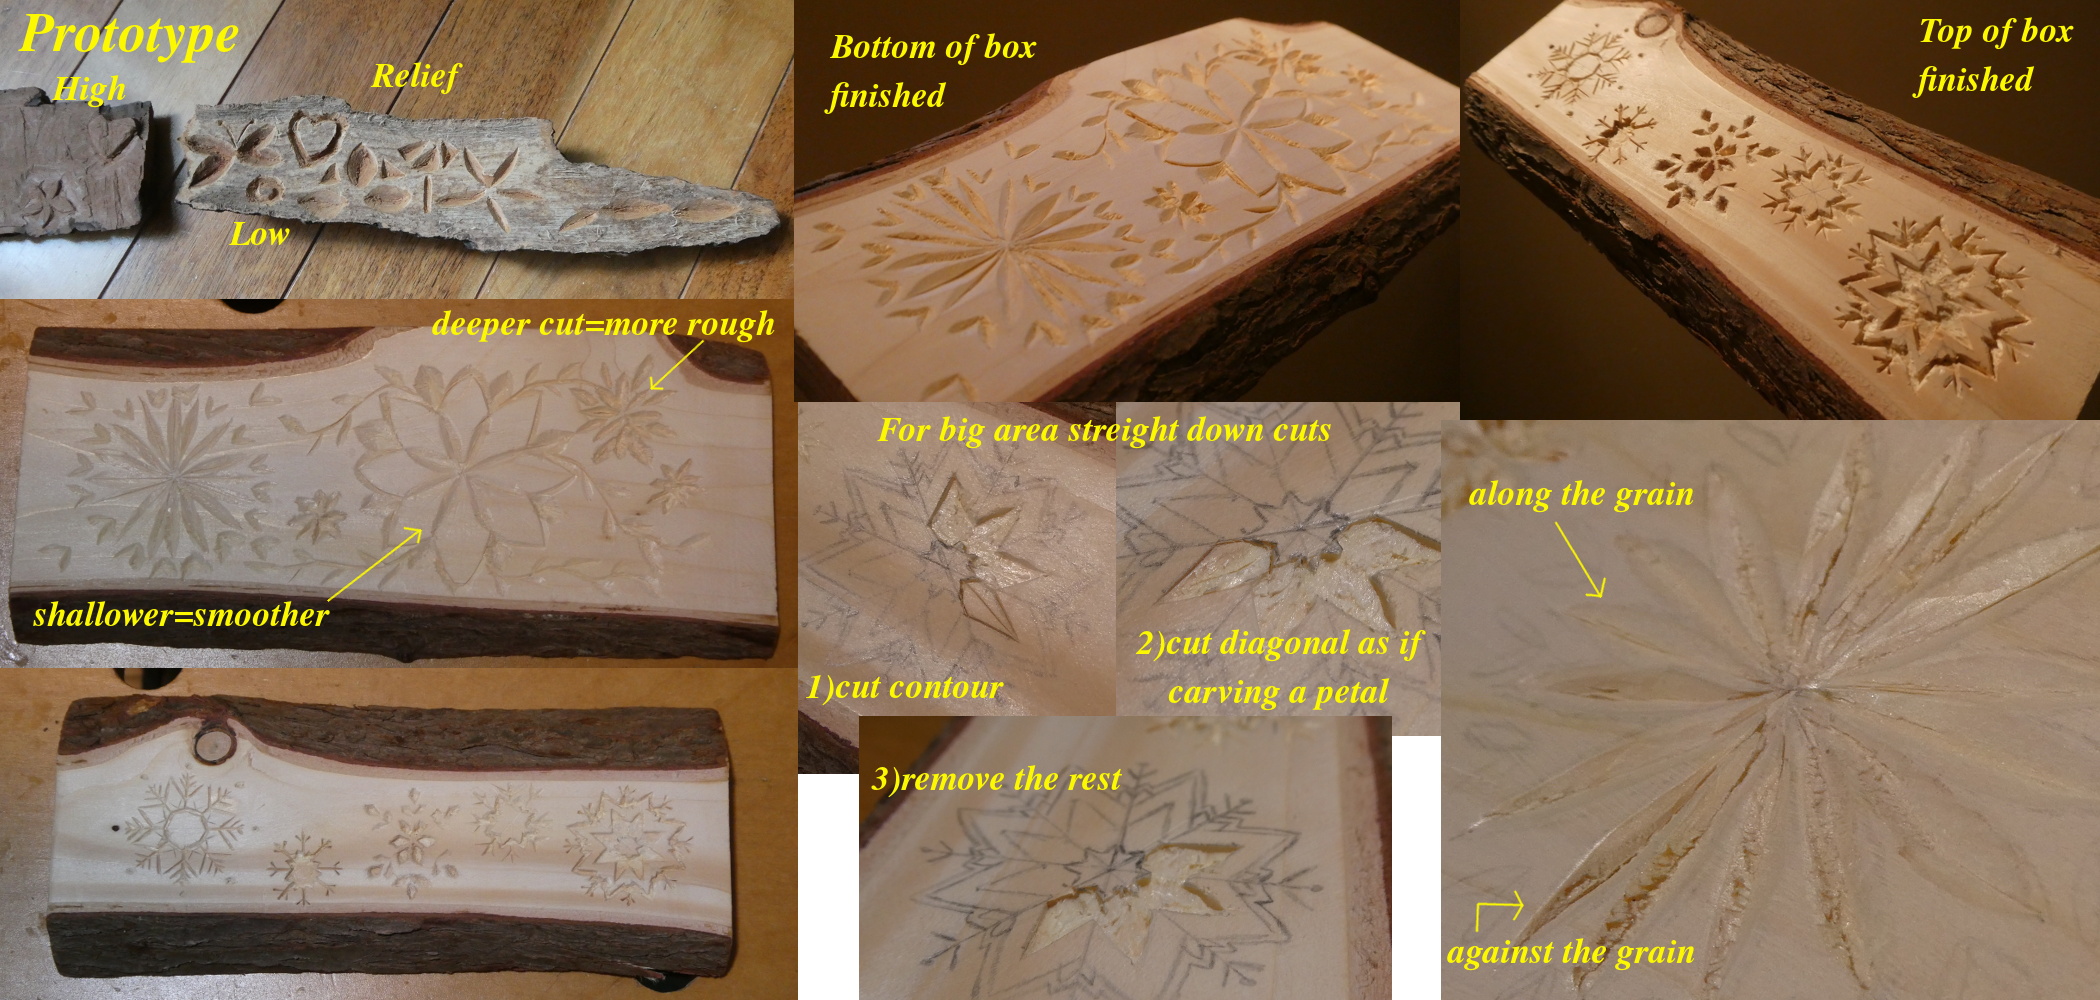
For the back panel I tried high relief(sculpted decoration is higher than surroundings).

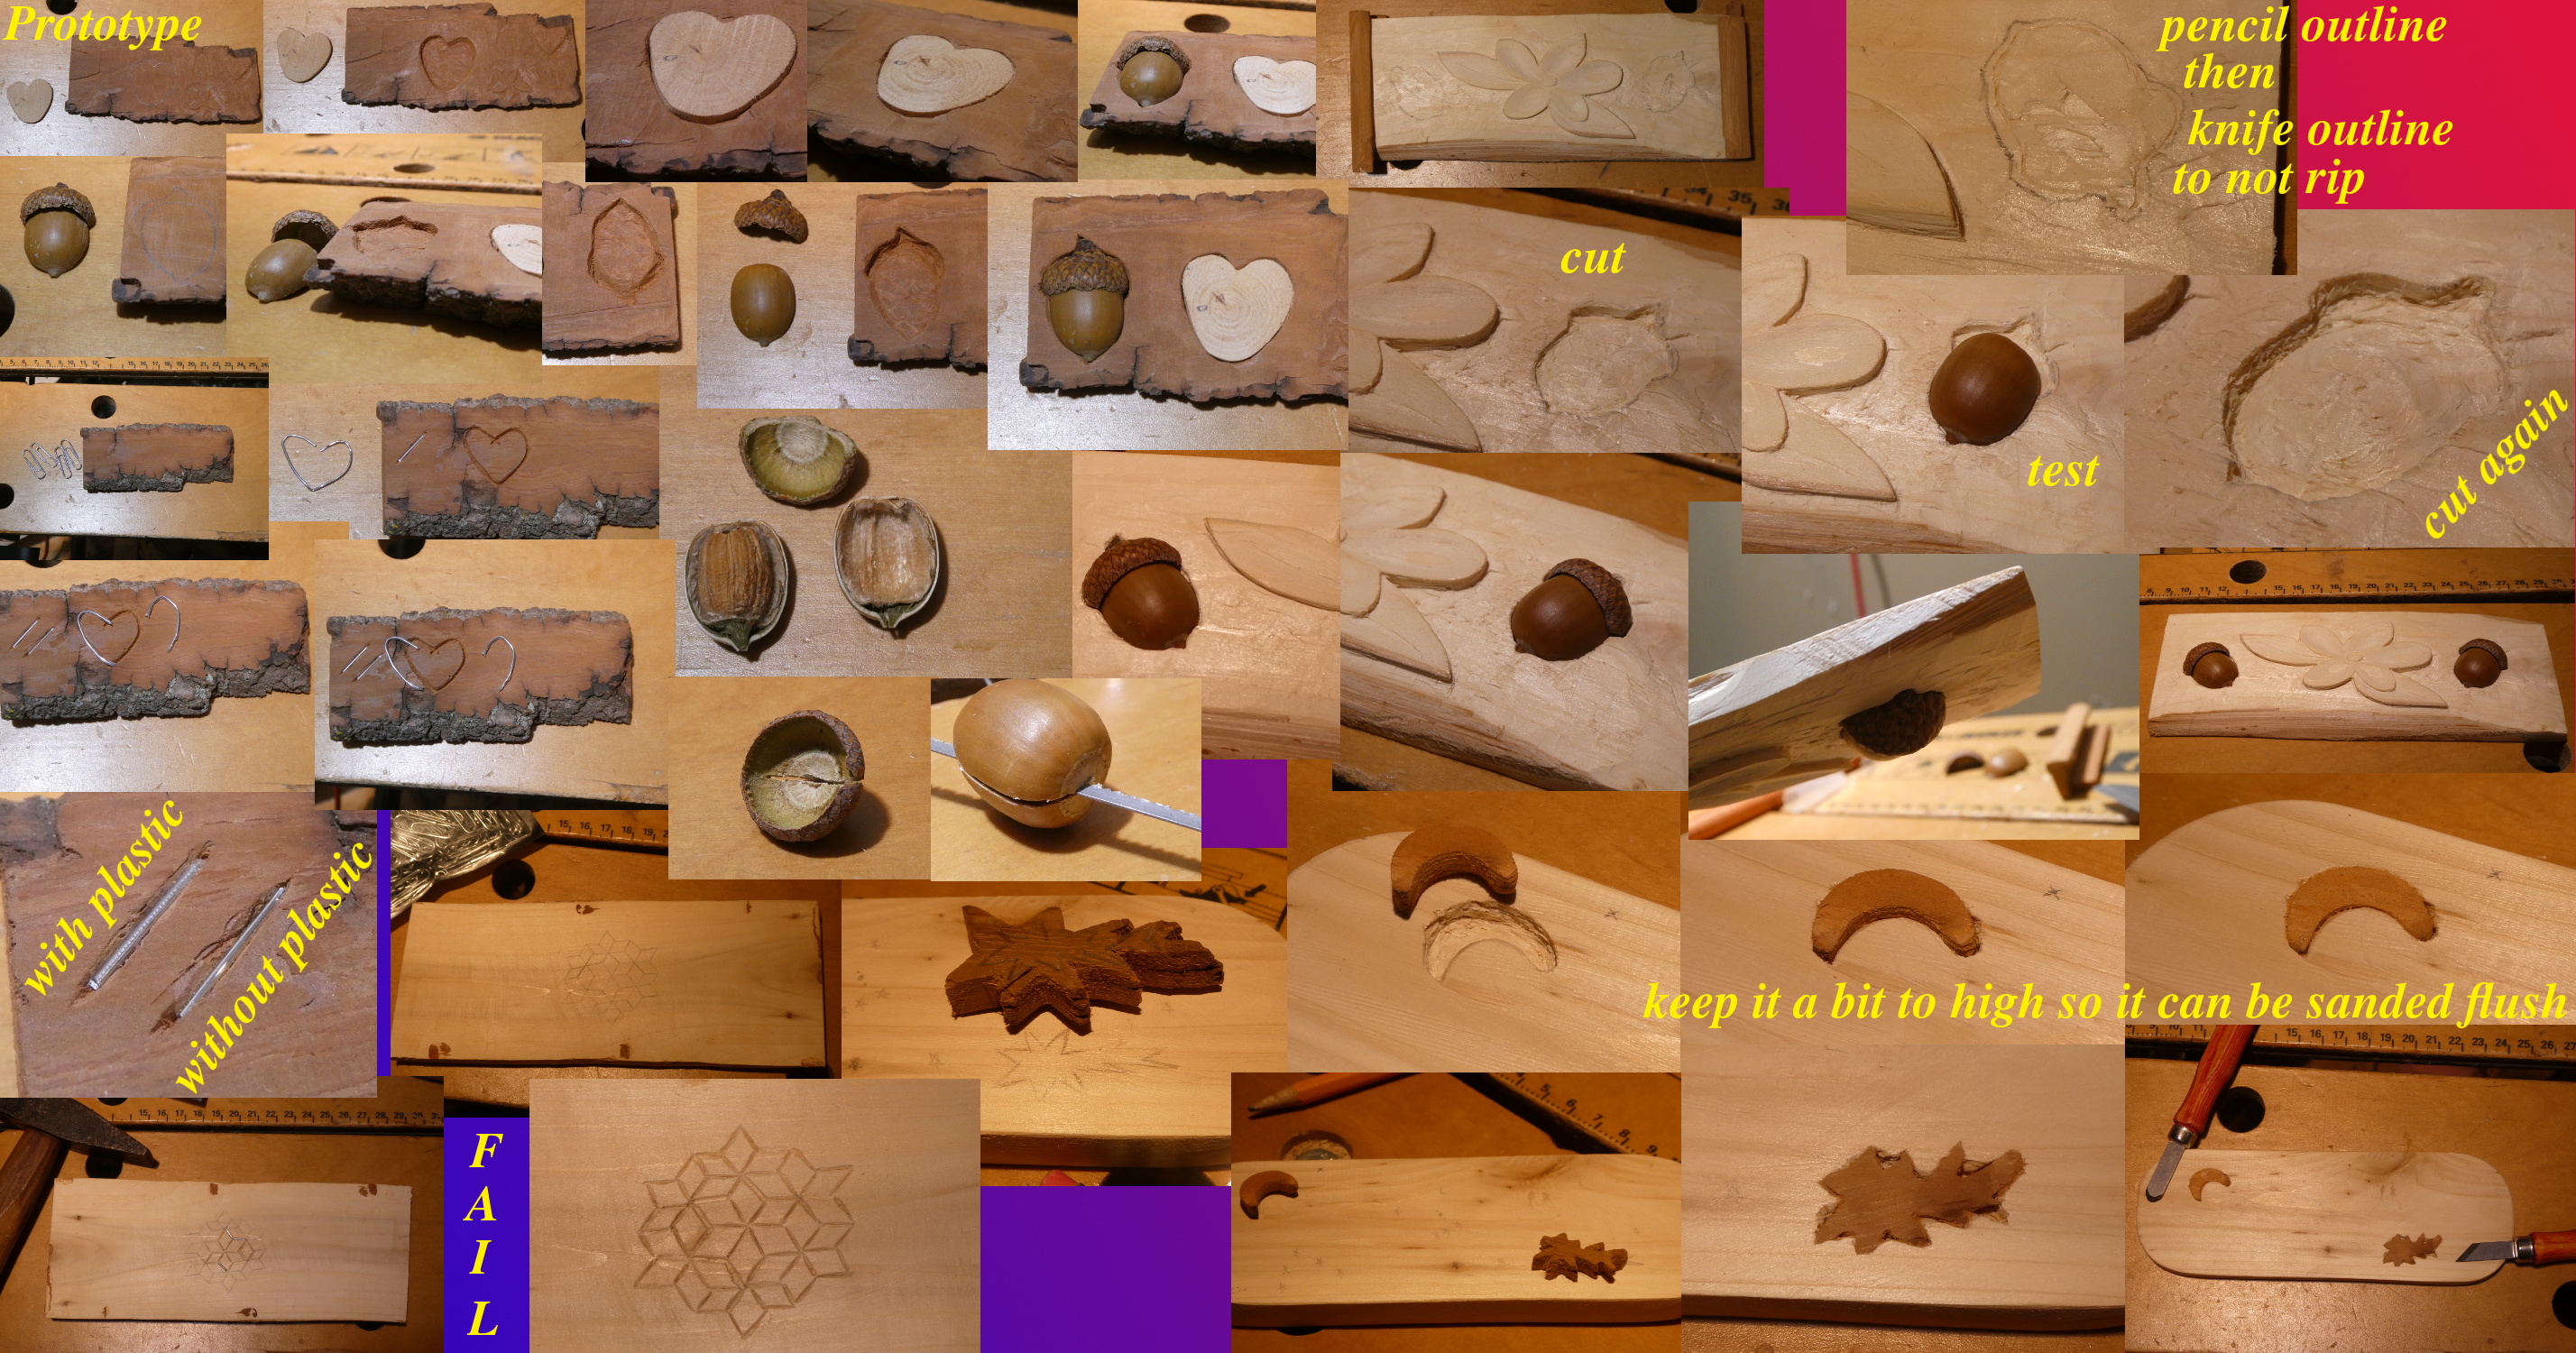
I initially had only planed on doing 2 wood inlays in the inside of the box for the night sky, but after practicing and inlaying some random other things I decided to add inlays to the back panel as well.
Prototype
From what I saw online, you start by cutting the piece to be inlaid. Then you trace where is should go. Then you go with a knife and cut along the entire edge so that when you remove wood in the next step you dont rip past the border that you drew. Then remove wood inside the border with a chisel to ruffly the correct height. And finally put the inlay into the cut-out part and make small adjustments until it fits perfectly. Then sand the surface flat and smooth. The piece can be glued but should also stay through friction since it should be a near perfect fit.
Following these instructions, I tried inlaying a heart and it worked out great. I did not perfectly match the cut-out so there is a small gap at some spots but over all it's pretty good for a first try. And it really does hold without glue!
Then for fun, I tried inlaying an acorn which sticks out from the surface to see how that would work. knifely(naively :) ) I cut the acorn in half with pliers which destroyed half of the nut but at least I still had the other half. Other than that, I was surprised at how well it worked: with no glue whatsoever it stayed in. Like the wooden heart you have to place it several times in the cut-out and make small adjustments to get that perfect friction fit. Also, halfway through I realized that since the acorn is hollow I should focus on making the outline deep enough instead of carving the whole thing out.
For the box
it was pretty much the same: trace with pencil, trace with knife, carefully remove wood, and then fine tune.
This time around I cut the acorn with a saw allowing me to use both sides. The acorn body fit perfectly, but the hat kept falling out cus I cut the hole just a tiny bit to big so I ended up putting a drop of glue on its tip.
For the wooden moon I got it pretty much perfect. And for the comet I went way overboard on sum spots, but it turns out I kind of like the holes, it makes the comet look less uniform.
By now I was very confident with inlays especially since the acorn prototype was such a success, and I was convinced anything could be inlaid. I found this pattern online made of rhombus shapes that together look like an endless flower or star pattern. But things dont always work out the way you want them to.
Prototype
From what I saw online you cut a shape into wood with a knife and chisel like when making a wood inlay. But then you pour liquid metal into it. Then you remove the excess metal by sanding it smooth and flat.
However, I dont have the equipment to melt metal so I had the brilliant idea of inlaying paper clips instead.
The high hopes where short-lived however. Already in the poplar bark prototype the idea was falling apart. Straight flat pieces worked ok. However, bending the paper clip into a nice curve like a heart was impossible(at least with my tools). No matter how hard I tried to push and bend it into the wood, it kept falling out. The heart shaped paper clip was simply stubborn, never flat enough, always sticking out somewhere.
For the box
Despite the failure I wasnt going to give up. In the prototype the straight flat pieces had not fallen out and since I was using different wood for the box I was hopeful. So, I cut slits into the wood and tried pushing the straight pieces in. I tried hammering them in. Eventually I gave up and just made the pattern low relief instead.
I really wanted to try raised panel and I thought it would nicely frame the carvings on the back panel.
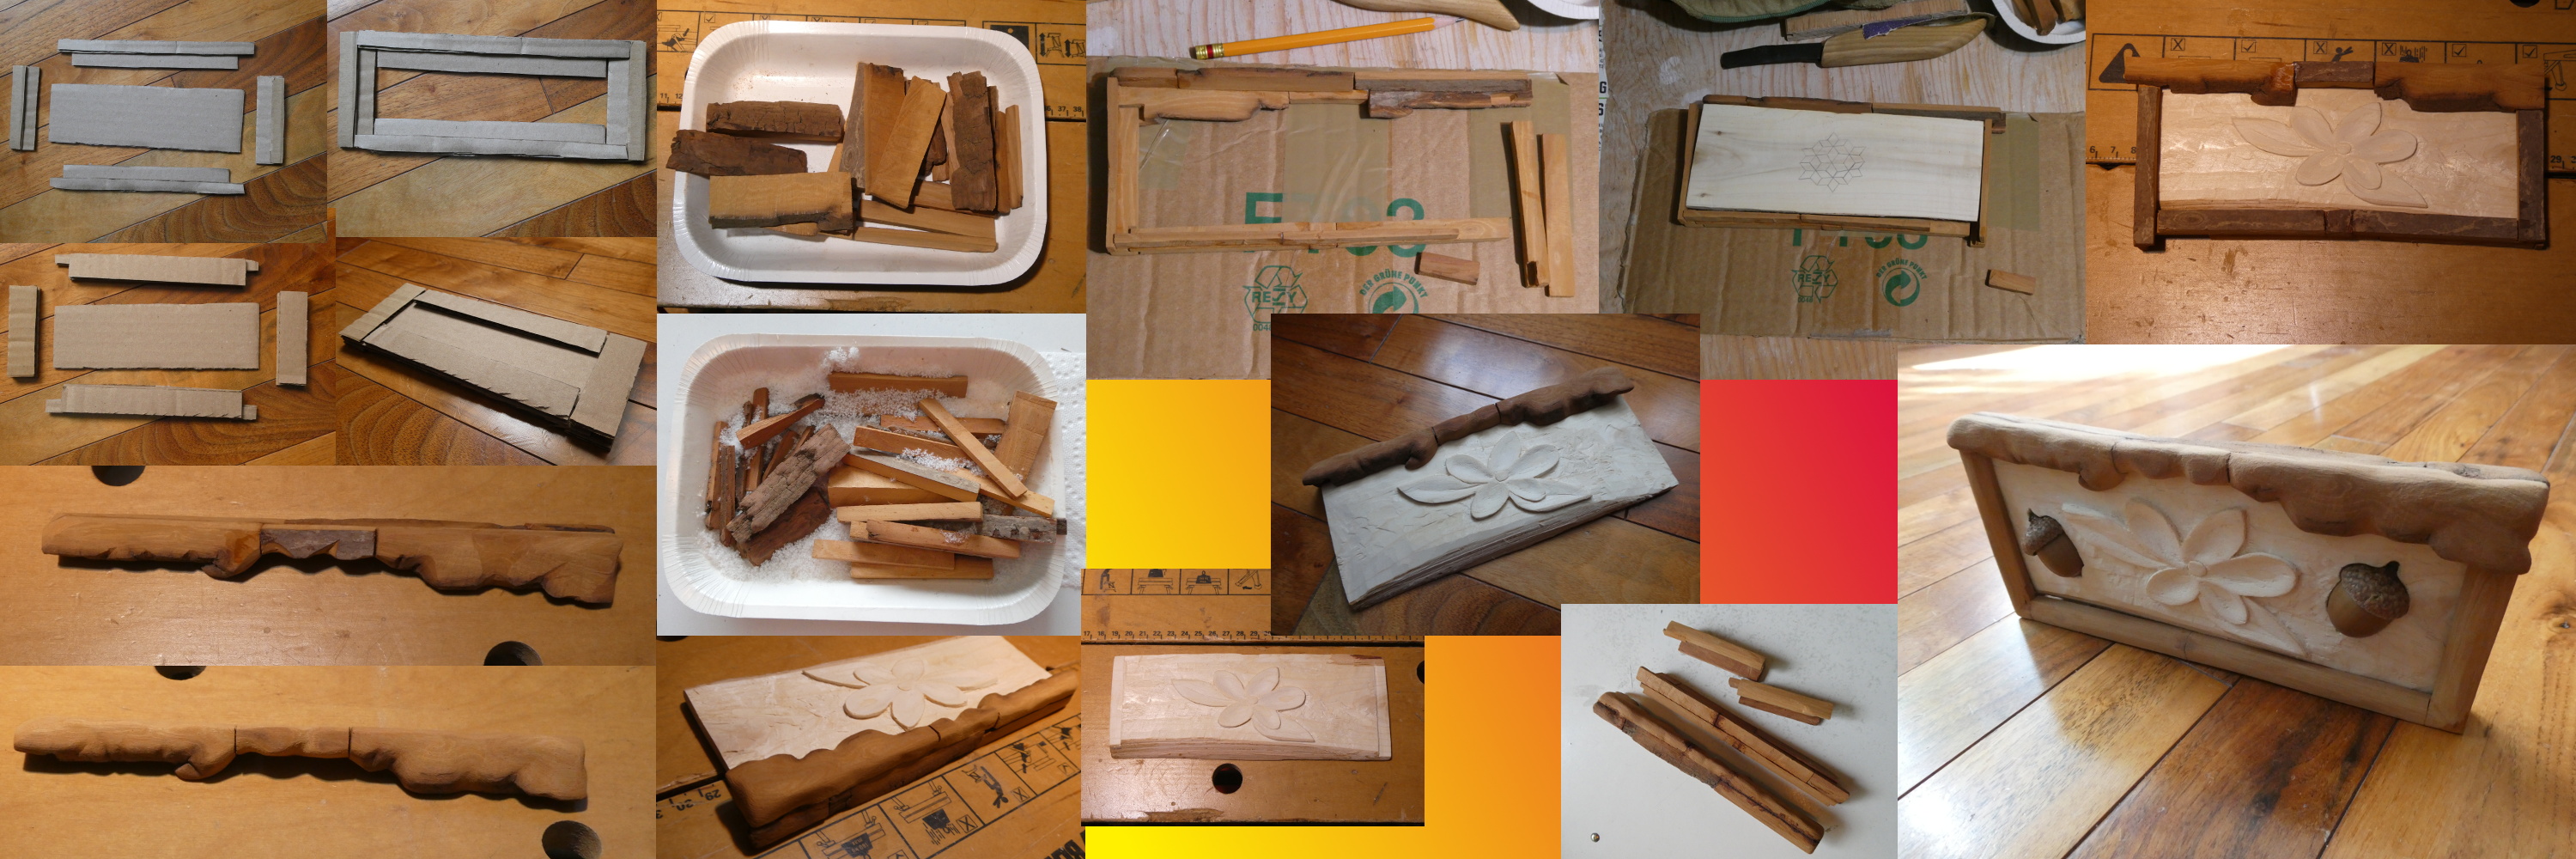
I cut poplar bark into the same sized strips as the ones I made for the door except that the ones that would go on the front of the panel would be double in height. I had planed to then carve these thicker pieces into a rounded slope to make it look like a nice frame, but then I had an idea. A while ago on YouTube I had seen a video of someone making a table with beautifully carved wooden panels on the sides making it look like white chocolate was running down the table https://www.youtube.com/watch?v=wXE9N8CnT5A(AlmFab, minute 11 of the video). Two of my strips had some bumps on the side that I had not yet cut off which could easily be shaped into some viscous substance dripping down the top of the box along the frame.
The plan was all set, I laid everything out, but every side was either to short or to long. After moving things around a million times trying to minimize gaps I finally committed, cutting my strips to size and gluing them together. However, I kept the whole thing in 4 pieces so that I could still take it apart and make final adjustments. Once the glue was dry I carved and sanded and carved and sanded and...It took me a really long time to get it the way I wanted it but I think it looks great now.
Finally, I glued the 4 pieces together and sanded one more time for final touches.
On YouTube I say several videos of people cutting plywood or old colored skateboard decks and gluing them back together such that the different colored wood stripes created beautiful patterns.https://www.youtube.com/watch?v=wXE9N8CnT5A(AlmFab) and https://www.youtube.com/watch?v=4ld6IWM0Llk(Andrew Szeto)
To attempt my own version I of course made a paper prototype first. Lined paper looks a lot like plywood strips.
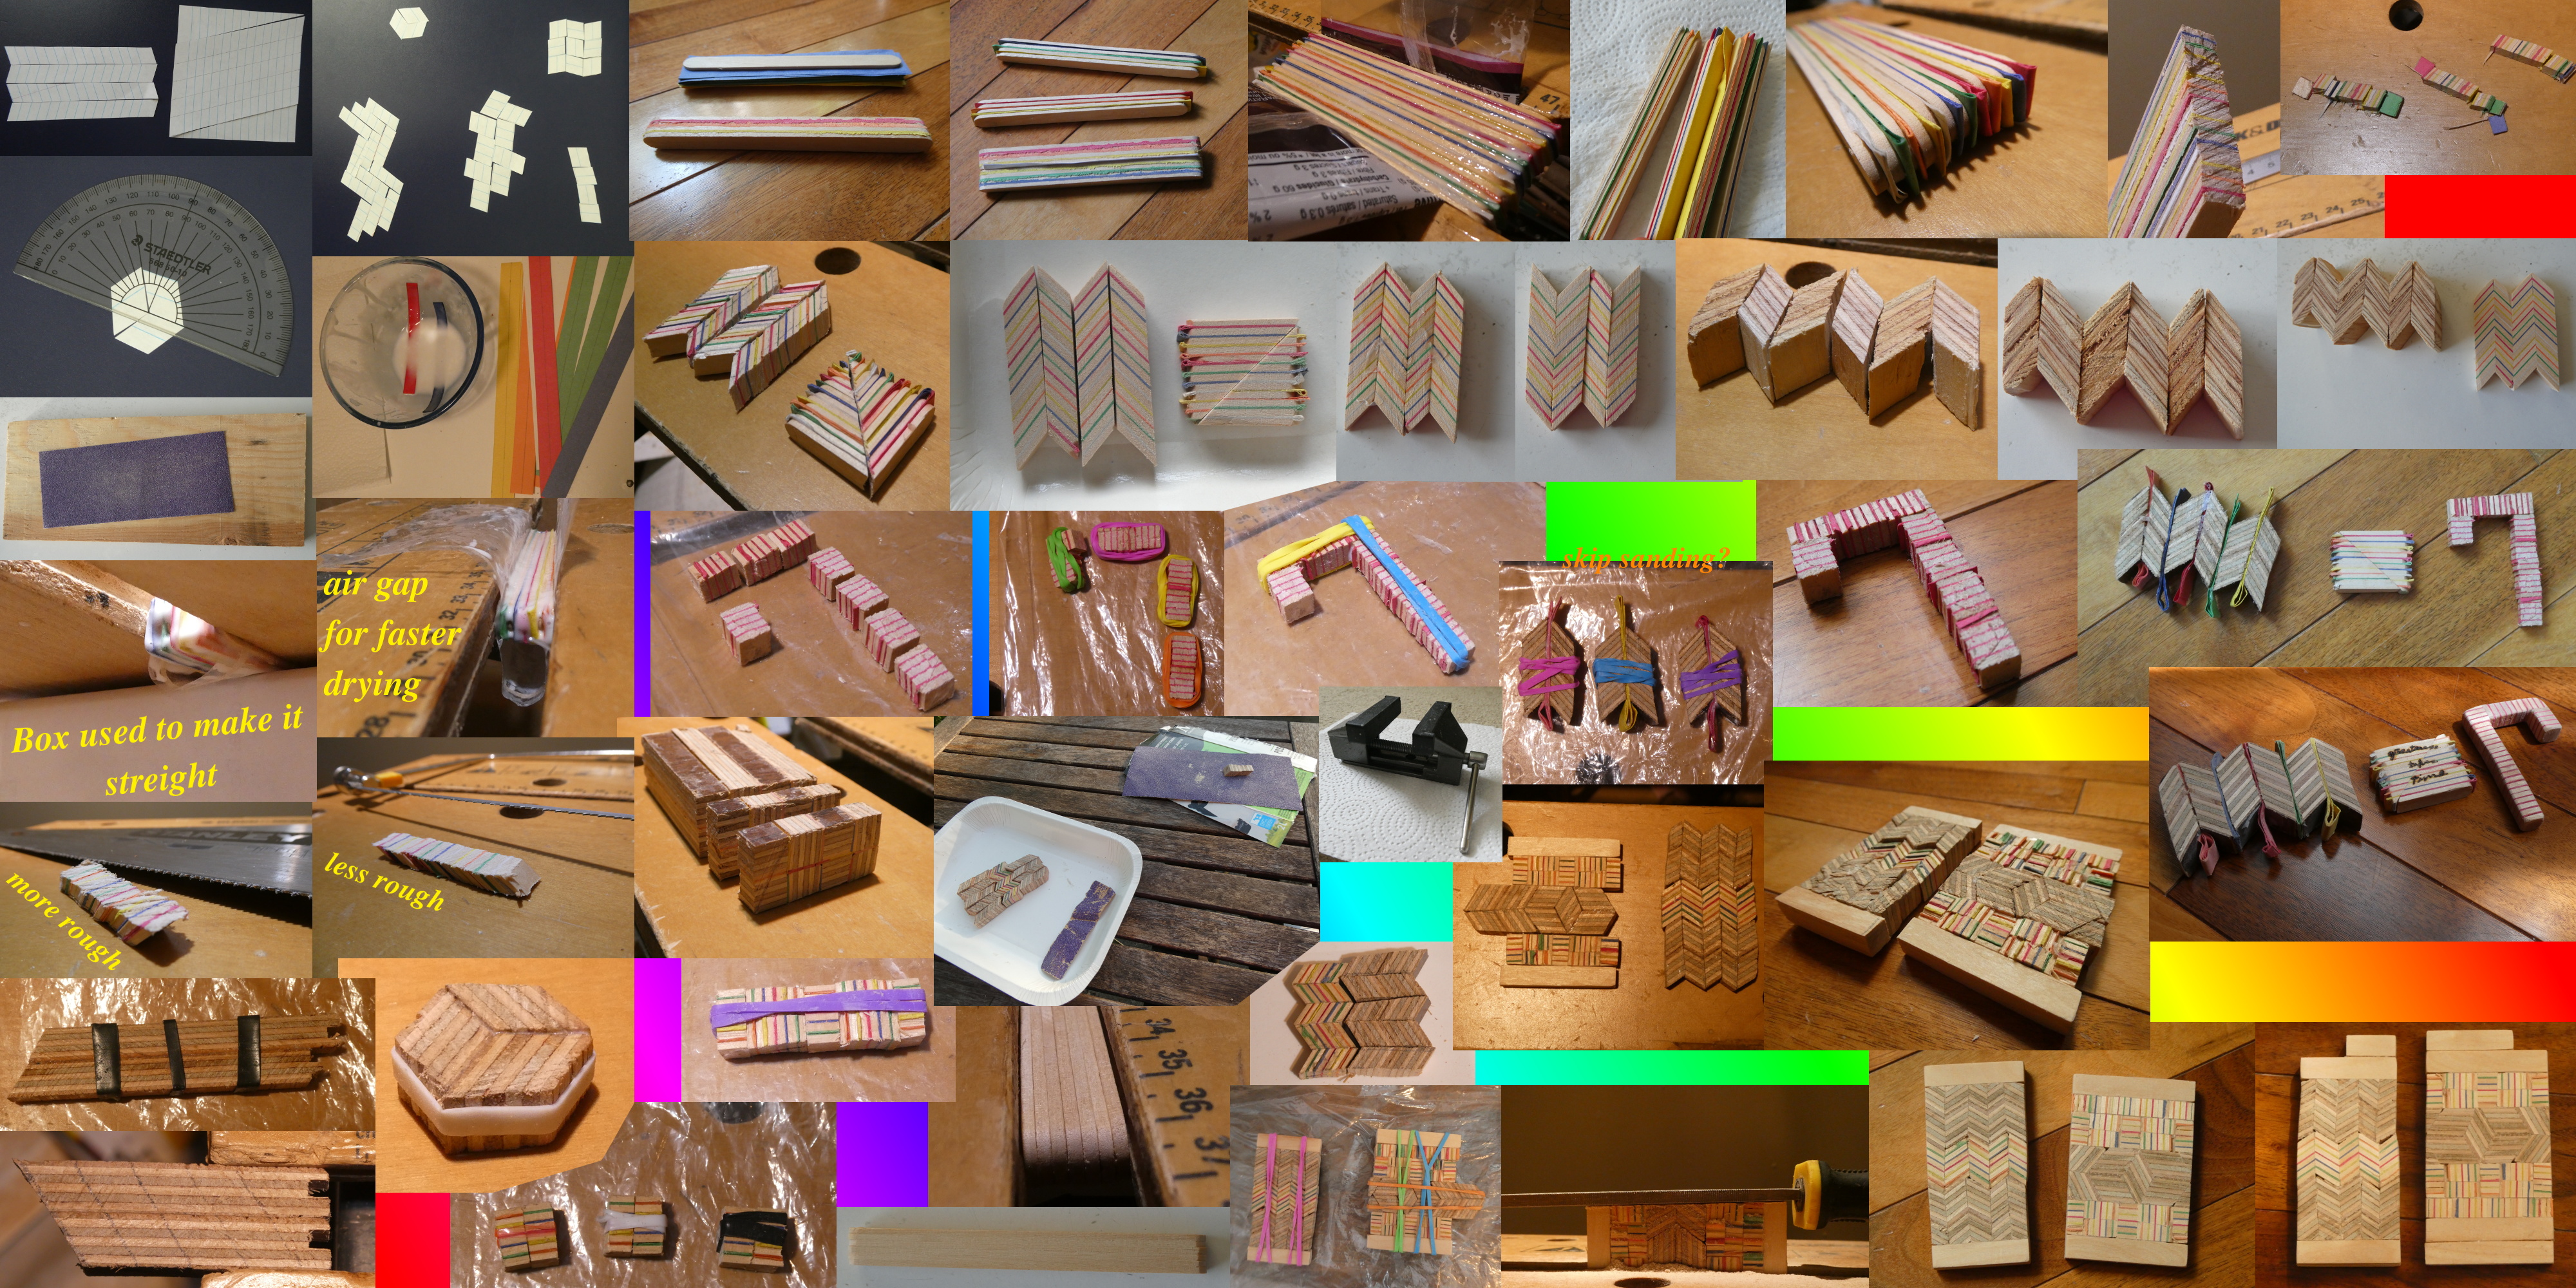
I cut the popsicle paper block into angled strips which did not fall apart this time and then sanded them. I dont know if my file is dull or not cus it works great for sanding poplar bark but popsicle sticks(which I think are made of maple wood) took foreeevveeerrr. It turns out I dont know physics, but... I'll elaborate on that below in the "for the box" section.
In the meantime, I tried sand paper which was much faster, allowing me to sand all the strips in no time before gluing them back together to make a nice triangle pattern. By the way, I learned that bending sandpaper breaks the sand grains off so dont do that. In retrospect, I should only have sanded the inside sides(the sides that will be glued together) because the surface sides where all angled slightly differently so once fully glued up I had to resand everything to get it flat. So, sanding the outside once would have been more efficient. Also, for gluing the strips together it was dry after 24 hours.
Now I know this sounds like a lllooooottt of work but look how beautifully it turned out! And you can make so many different shapes.
I also tried making a candy cane which looks really nice but was a pain to make because every time I tried to sand it, it would break and I had to glue it again. I initially thought it might be because I used rubberbands to press the glue-up together and they are not as tight as a real press(but more practical for many shapes). But at this point I have reglued the candy cane so often that I am convinced it is actually caused by the small surface area between the pieces because I tried rubberbanding other plywood pieces and they did not fall apart.
Through reglueing the candy cane so many times, I also discovered that if after applying glue you wait 5 to 10 min before putting rubberbands on then you can glue several pieces together at once without the pressure of the rubberband snapping them apart.
I also got a small press(not a newspaper :) ) so that I can use the workbench instead of watching glue dry :)
(By the way, later I figured out that for square patterns it is easier to glue a bunch of square sticks held together by rubberbands because then you can easily cut these into many boards. This is how you mass produce boards with the same pattern!)
It was exactly the same as the popsicle stick paper block(cut into strips, sand each piece on the gluesurfaces to minimize gaps between pieces, glue strips together, sand flat) except since the initial glueing is skipped, it's faster and less work.
I also tried skipping the sanding before glueing by just putting colored paper in between. And Im surprised how well it worked. Of course there are more gaps then if its properly sanded but for the fact that it's a lot less effort its quite good.
I mixed plywood and popsicle stick colored paper and tried out different patterns.
Also, I figured out how to cut the strips without ripping the piece at the ends! My dad once told me that to minimize damage to a tree when cutting a branch, you have to cut a little bit on the bottom and then cut from the top. Here with my glued up block it's the same, if I cut on both the top and bottom or even on all 4 sides it cant rip because the motion of the inside is restricted by the outside.
For sanding, I discovered that sandpaper is amazing for small pieces or other pieces that are hard to clamp. It also makes it a little bit smoother to the touch then a file so for final touches it's great. However for big pieces, if I clap(lol clamp :) ) the wood into the workbench then using a file is easier because I can apply more force.
Last but not least, I needed to put screws into the side walls but I figured that drilling holes into the pattern glue-up could easily end in disaster. So, I instead glued up popsicle sticks into a block. Like this I have 2 of the 6 sides made of solid wood making it safe to drill into. 5 popsicle sticks where needed to get the same width as the pattern wood glue-up. Once sanded I was impressed because you really have to look closely to see that it's 5 popsicle sticks!

For both the pattern plywood and the raised panel I tried filling the gaps between the wood pieces with saw dust mixed with glue.
For the raised panel, even though I used the same poplar bark to make the saw dust, the filled spots stayed darker than the rest of the wood even after sanding. The other problem I had was that even though the top layer looked filled, underneath it was still hollow. So, if I cut a piece away the hole I had tried to fill was back. However it could very well be that I just did not put enough filling and that this is not an actual problem.
For the pattern plywood I had better results because it already has many different wood colors making the color difference unnoticeable.
So if there are holes that really bother you and a difference in color is not an issue then this is a good fix.
I also wanted to decorate the insides but, I was worried especially for the bottom that it would be impractical to store things in the box if the inner surface was not fully flat, so my solution was to do some wood burning art.
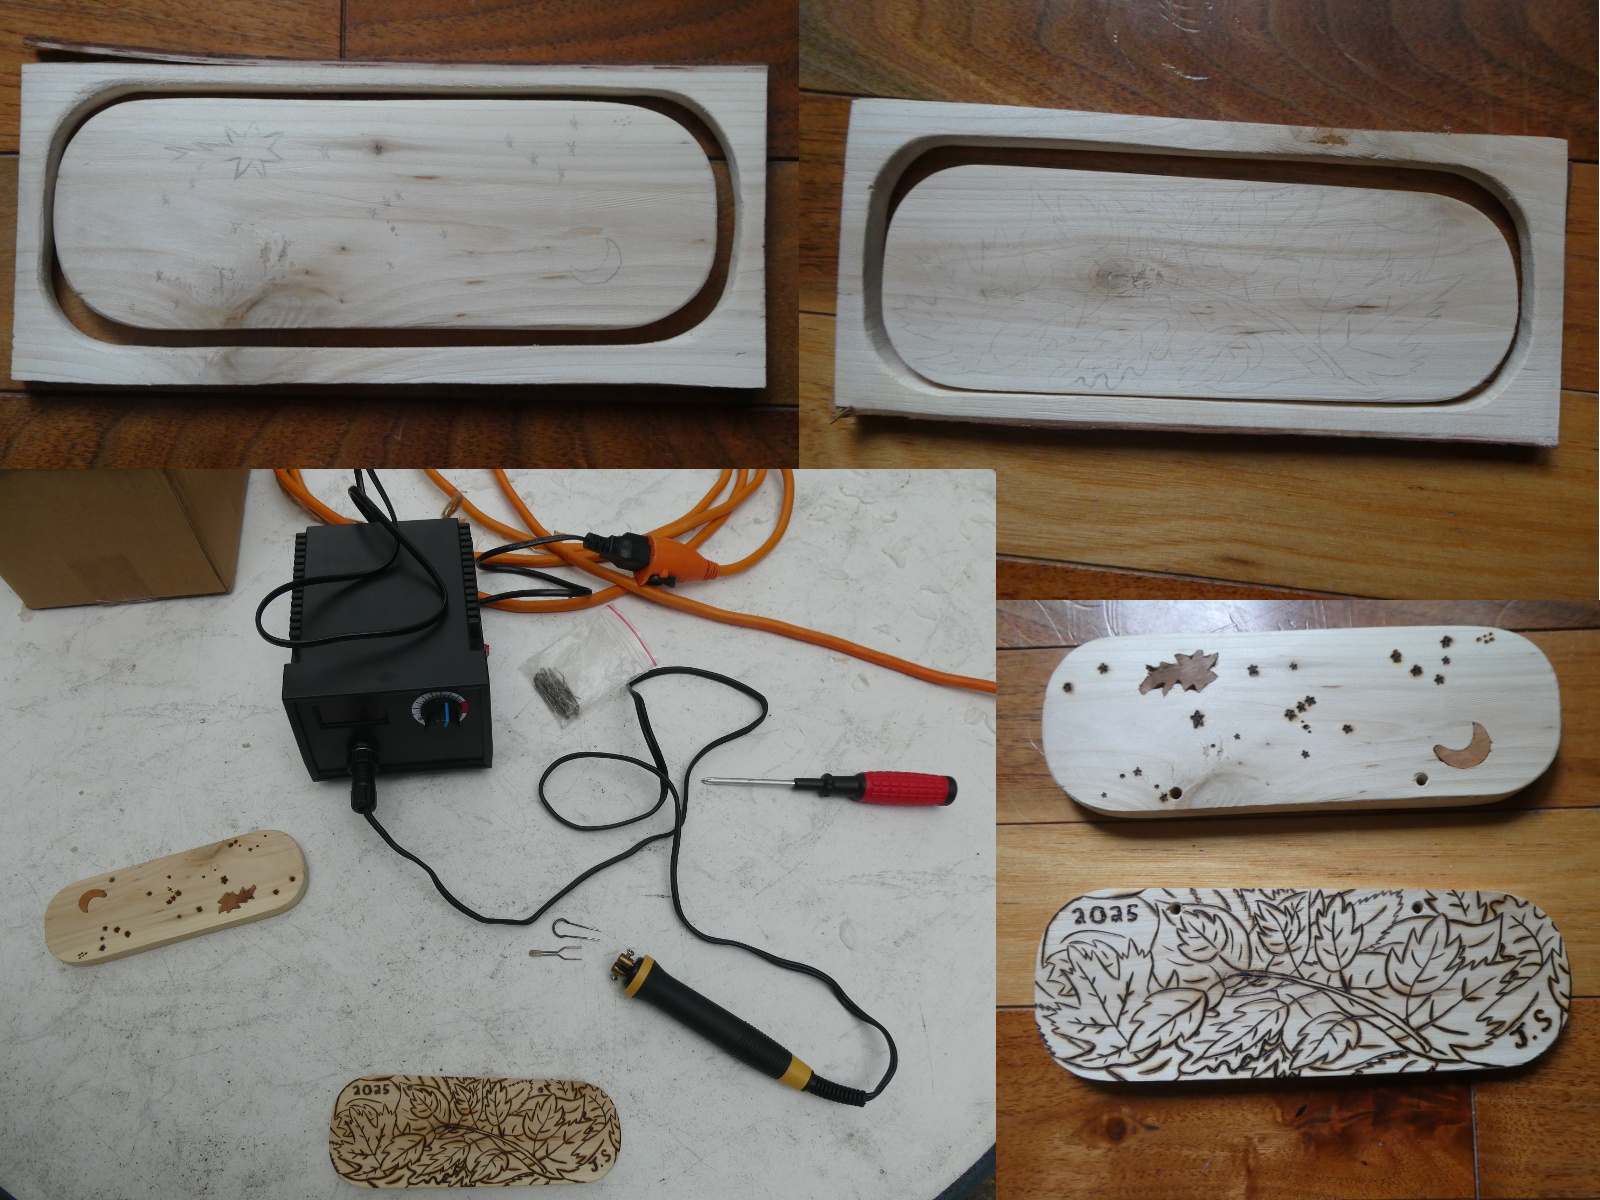
I've done wood burning many times before, its like drawing just your pencil is a bit hotter. From my experience so far, here are some wood burning tips and tricks:
Copyright © 2024-2025 Jessica Socher ()